Some Mistakes When Laying Tiles
Laying floor tiles is the go-to method for modernizing the look of a home. No matter what style of tile you choose, tile done wrong will have a negative effect on the look of your home. Don’t let this stop you from attempting this DIY project.
We are going to show you how to do tiling the right way. Follow these steps and you will be tiling like a pro.
- Wrong Trowel Size
The size of your trowel needs to match the size of the tile. The larger the tile you are using, the deeper the thin set needs to be.

To create the deeper thin set you need a trowel with deep notches. The deeper notches allow for adjusting while laying tile.
Make sure the thin set you buy has phrasing like “large tile” or “large format” on it. This thin set is thicker and holds the larger tiles.
As a general rule, a half inch trowel works for tiles up to 16 inches. Tiles bigger than this need a 3/4 inch notch.
Remember that you will go through your thin set faster because you are using more. A 50-pound bag should cover a 40 to 50-foot square using a 1/2 inch notch. That same 50-pound bag should cover a 30 to 40 square foot using a 3/4 inch trowel.
- Cracking the Tile
When cutting tile, take some precautions to make sure you do not break them. Too many broken tiles will become wasteful and expensive.
Using a diamond wet saw is the best method for cutting tile. A diamond saw blade is abrasive and not toothed. Before cutting, mark the tile with a pencil. You can use a regular lead or grease pencil for this.
Place the tile against the fence and line up the line with the blade. You will need to wait for the water to flow after turning the saw on.
Use a slow even pressure while making your cut. As you get to the end of your cut push the two halves together. Holding the tiles stops them from breaking.
If you heard the blade slow down as your cutting then you are pushing too fast. The harder the material you’re cutting is, the slower you need to go.
- Wrong Underlayment
The underlayment is the surface that the tile gets installed on. You need a flat, even, and strong surface. If you do not have this your tile will sag and crack in places.
If your underlayment is not suitable put down 1/4 to 1/2 inch cement board first. Then lay your tile on top of the board.
If you have old vinyl flooring that is suitable you can tile right over it. This is assuming that the floor is thick enough to support the tile.
Look at the subfloor and determine how far apart the floor framing is. If the framing is 16 inches apart you should add 1-1/8 in thick cement board. If the floor framing is 24 inches apart the added cement board should be at least 1-1/2 in thick.
Keep in mind that you are raising the height of the floor when adding cement board. You’ll need to raise the vanity and extend the toilet ring.
- Laid the Tile Out Wrong
Laying tile in a diagonal pattern requires special planning. If your tile is square you can measure 45-degree angles.
How you lay tiles changes when they are diamond and not square. Start by centering the tiles. Line up the corners with a single layout line.
Build the design out around this first measurement. Check your lines with a straightedge as you work.
- Wrong Grout
The wrong grout or grout done wrong can ruin the look of your DIY tiling project. You want clean and even grout lines.

Mix your grout with a trowel until you have a peanut butter consistency. Using a drill or paddle will introduce air which weakens the holding strength.
Be sure to let the grout rest for 10 minutes before using it. Skipping this step will result in a weaker grout that will crack.
- You Didn’t Prepare
You need to clean and prep your surface before you tile. Remove any grease, dirt, or fingerprints.
If you don’t do this step, the adhesive won’t stick to the wall. This is an issue most common when tiling bathroom or kitchen walls.
Use a water and mild dish soap mixture to clean the walls. If you have a lot of stains or buildup use a paint deglosser or abrasive pad.
- No Backer Board
Grouting Tile – The Purpose of Laying JointsIf you are tiling in an area with water you need to use a backboard. The backer board stays stiff and prevents water from seeping into where it shouldn’t be.
Cement board is the most durable type of backboard. It is cement and sand and then reinforced with fiberglass.
Fiber cement board is cement and sand and reinforced with wood fiber. It is like the other cement board but comes with limitations for use.
Glass mat gypsum works well for damp areas, but not places with constant water. They are silicone-treated gypsum and reinforced with fiberglass.
If you are tiling around a sink water-resistant drywall works well. It can resist the occasional splashing but not constant moisture.
- Bad Caulking
When tiling in your bathroom one of the final steps is to caulk the joints. Caulk a straight line down the corners and along the edge of the tub.
Buying the Supplies

It is important to buy the right caulk meant for kitchen and bathroom use. This type has additives that prevent mold and mildew from growing.
You have the option of buying latex or silicone. Silicone lasts longer but is harder to clean up. Latex is easier to clean up after, but may not last as long.
You will also need to buy the right color. Hardware stores will only carry white, clear, and almond. Head to a flooring supplier for more custom color options.
Laying the Caulk
Spend the extra money and buy a high-quality caulking gun. This will give you a smooth line of caulk. Cheaper guns will cause your line to be too thick and too thin in places.
Line the area you intend to caulk with masking tape. This will give you a clean line on either side.
Cut the nozzle on your caulk to match the width of your gap. This will make the line of caulk match the size you need.
Once you lay a line of caulk, wet your finger and wipe away the excess. The final step is to remove the masking tape while the caulk is still wet.
- Not Buying Enough Tile
The main reason for not buying enough tile is because you failed to plan ahead. Take the time to make the proper measurements and then check them.
Start by measuring the length and width of the area you plan to tile. Multiply your measurements by 2.
This gives you the square footage. Divide the square footage that comes in the box of tile by your room’s total square footage.
This number is how many boxes it will take to cover the floor. Next, you need to calculate the overage.
Multiply your room’s square footage by 10% and then add this to the room’s number. Then divide by a single box square footage.
This new number is how many boxes you need to buy. The extra boxes will cover cuts, breakage, and waste.
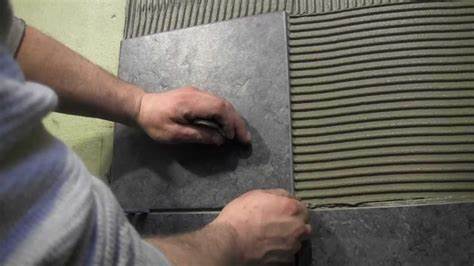
Laying Floor Tiles
The first step in laying floor tiles is to have the right equipment. You will need a trowel with the right sized grooves for spreading the thin-set.
You will need the right diamond saw to cut the tile without breaking it. Then laying the tile you’ll need the right base.
Prep your tile by buying enough and laying out the pattern before you start. Once you place the tile you’ll need to grout.
Work your grout so that it gets the right consistency and doesn’t have air bubbles. Then follow the steps to clean up the grout so your finished tiling looks beautiful.
Get ready for your next tiling project with one of these premium diamond blades.